 Skip to content

ATV Setup & Troubleshooting
What type of gas should I use?
Regular unleaded gasoline works just fine, however we recommend to use unleaded premium gasoline for best performance and a healthier ATV. DO NOT USE DIESEL FUEL IN ATV!
What is the mixing ratio of gas and oil?
Since this is a 2-stroke engine, you will need to mix oil and gas together. In your package, you have received a mixing bottle. Please see image1. Pour gasoline first, and oil second! Use red arrow to determine which line to fill the gas up to; and use yellow arrow to determine which line to fill oil up to. Take note: You are putting in 25x more gasoline than oil.
 *image1*
 *image1*
What type of oil is recommended for this ATV?
Please use 2-Stroke Motorcycle or Lawnmower Oil ONLY! This can be found at your local Walmart or superstore of your choice.
How do I properly start the ATV for the first time?
If this is the first time you are starting the ATV:
- Mix oil and gas at a 25:1 ratio using the mixing bottle provided with the ATV. Refer to “What is the mixing ratio of gas and oil?” section for proper mixing ratio!
- Stand the ATV upright; you should be sitting on the ATV. The pull start cord is on your right side.
- Turn the gas valve in the vertical position opening the gas to the ATV (as shown in image2 with yellow arrow, the gas valve in the UP position).
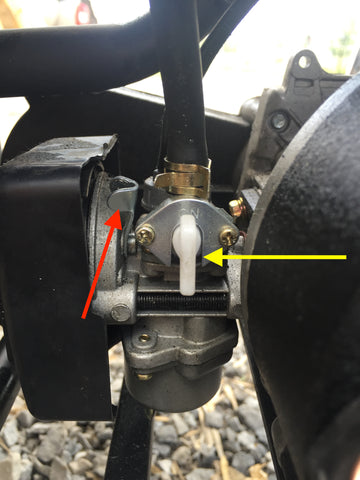 *image2*
 *image2*
- Wait 3-4 minutes, while sometimes rocking the ATV back and forth to allow the gas to flow through the fuel lines for the first time.
- Put the choke lever in the closed position (as shown in image2 with red arrow, the lever in the UP position).
- Pull the start cord out slowly until it reaches its maximum distance, allowing the gas to flow into the ATV. Repeat 2 times.
- On the 3rd attempt, pull the cord quickly with the intention of turning the ATV on. This may take a few attempts as the ATV is being turned on for the first time.
- Once the ATV is on, let it warm up for about 1 minute.
- Once ATV is warm, pull the choke lever in the open position (as shown in image3 with red arrow, the lever in the DOWN position).
- The ATV is now ready to ride. Enjoy!
In certain weather conditions, you may put the choke lever in the middle or lower position to help make it easier to start.
Starting may require several tries when the ATV is still new. After break-in, the ATV will start up with only one or two pull procedures.
It may help to give the ATV a little twist of the throttle on the 3rd quick pull if the ATV is hard to start.
 *image3*
 *image3*
If this is not the first time starting the ATV, open the gas valve in the vertical position (as shown in image2 with yellow arrow), allowing the gas to flow through the ATV, then:
- If the ATV is still warm: put the choke lever in the open position (as shown in image3 with the red arrow, the lever in the DOWN position) and turn the ATV on as you usually would with the pull start.
- If the ATV is cold (hasn’t been turned on for a few hours or more): Put the choke lever in the closed position (as shown in image2 with the red arrow, the lever in the UP position). 2. Follow steps 7-9 above. Enjoy!
How to turn off the ATV properly after each ride?
Once you are done riding the ATV and plan to turn it off, turn the gas valve in the horizontal position, closing the gas to the ATV (as shown in image4 with the yellow arrow, the gas valve in the HORIZONTAL position). This stops the gas from flowing around the ATV, which in turn prevents the carburetor from flooding in the future.
If you would like to go the extra mile and have your ATV last longer than normal for future use:
- When done riding the ATV, do not turn off!
- Turn the gas valve in the horizontal position (as shown in image4 with the yellow arrow)
- Let the ATV sit for a few minutes while it empties all the excess gas.
- The ATV will turn off on its own, cleaning the excess gas left in the fuel lines.
To turn the ATV back on, view “If this is not the first time starting the ATV…” section.
 *image4*
 *image4*
What to do if my ATV does not stay on? It turns off on its own.
OR
ATV wants to take off on its own when idling. How do I adjust the idle?
On the left side of your ATV when you are sitting on it, look inside the ATV, and you will see a gold screw with a spring attached to the carburetor (as shown in image5 with the red arrow). This is your idle screw!
 *image5*
 *image5*
If your ATV does not stay on, and seems to turn off on its own:
Tighten the idle screw and this will constantly give gas to the ATV. DO NOT TIGHTEN TOO MUCH. Tighten the idle screw clockwise A LITTLE BIT. The more you tighten (clockwise) the more throttle you are giving to the ATV. Tighten the idle screw no more than 2 turns at a time to adjust properly. You will need to adjust the idle a few times until you find the perfect setting for your ATV.
If your ATV wants to take off on its own when idling:
Loosen the idle screw. Too much throttle is being given to the ATV, which makes it want to run on its own. DO NOT LOOSEN TOO MUCH. Turn the idle screw counter-clockwise LITTLE BY LITTLE. The more you loosen (counter-clockwise) the idle screw, the less throttle being given to the ATV and can give you a hard time starting your ATV. Loosen the idle screw no more than 2 turns at a time to adjust properly. You will need to adjust the idle a few times until you find the perfect setting for your ATV.
How do I use the speed governor on my 49cc ATV to limit the maximum speed the ATV can go?
On the right side of your ATV, where your throttle is located, there is a bolt (as shown in image6 with red arrow below). You would tighten this bolt to your preference. The tighter you screw the bolt, the lower the maximum speed will be set. This would limit the distance the throttle can be pushed, thus limiting the speed.
 *image6*
 *image6*
How long is the break-in period for my ATV?
When the ATV is brand new, the first 3-4 tanks of gas is the break-in period. It is recommended to not run your ATV at max RPM's for more than 1 minute at a time during the initial break-in period. After the break-in period, you can run the ATV as hard as you want!
A part on my ATV is broken! How do I fix it?
If you happen to break a part on your ATV, depending on which part, it can be covered under the 6-months parts replacement warranty. If you have purchased your ATV within 30 days, we will replace all parts to you at no charge including shipping cost. WEAR AND TEAR ITEMS (such as tires, brakes, body kit, etc…) not included! The majority of parts on these ATVs can be repaired and replaced by a regular do-it-yourself person. No special tools are needed.
If you are within the 6-month period, please contact 1-855-912-5552 and explain your situation. All warrantable parts will be replaced at no cost, however customer must pay for shipping.
If you are over the 6-month period, please contact 1-855-912-5552 and explain your situation, or please visit https://www.belmontebikes.com/collections/parts to view a collection of OEM parts for your ATV!
If you are looking for wear and tear items, please contact 1-855-912-5552 and ask for the part you would like replaced. Or you may visit https://www.belmontebikes.com/collections/parts to view a collection of OEM wear and tear parts for your ATV!
If you have any further questions and/or concerns, please do not hesitate to contact us using the form below.